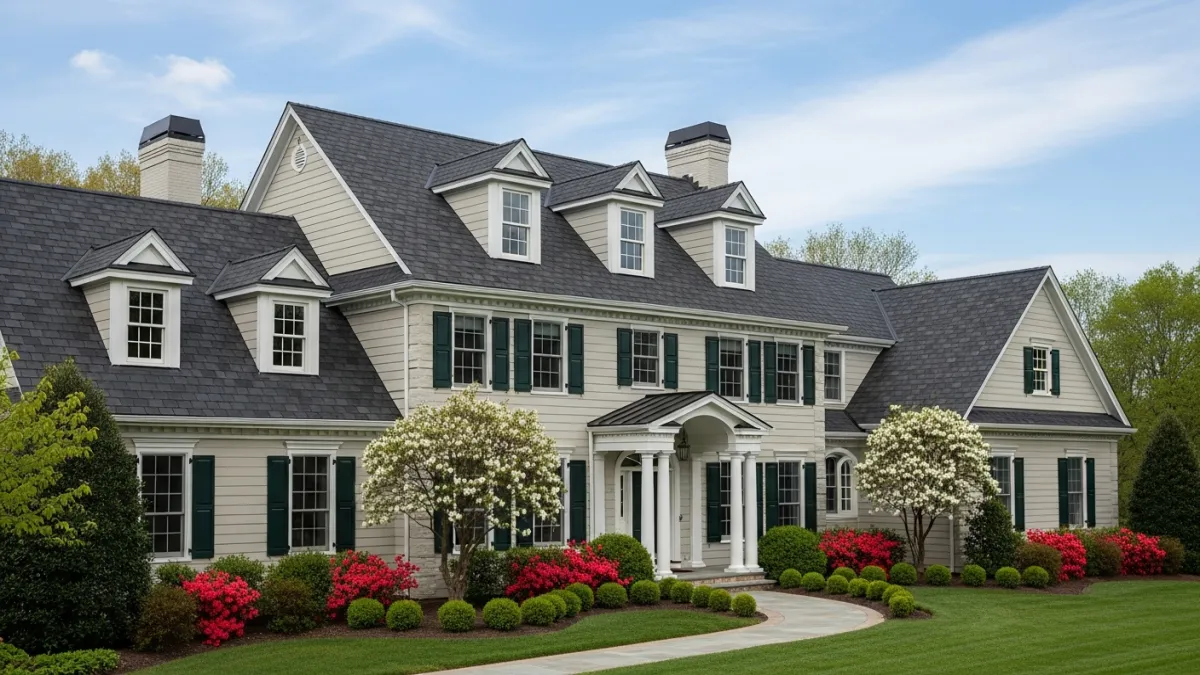
The Roof Replacement Process — What to Expect and How to Prepare
The Roof Replacement Process — What to Expect and How to Prepare
Key Takeaways
- A typical roof replacement process in Woodbridge VA takes one to three days on site, with two to four weeks of lead time for scheduling during peak season
- Architectural asphalt shingles cost $8,500 to $15,000 installed for a standard Woodbridge home, while standing seam metal ranges from $16,000 to $22,000 or more
- Prince William County requires a building permit for full roof replacements — your contractor should handle this
- Prepare your property by moving vehicles, clearing the perimeter, securing attic items, and notifying your HOA if applicable
- Always verify your contractor holds a valid Virginia DPOR license and carries both general liability and workers compensation insurance
If you own a home in Woodbridge, VA, the roof replacement process probably feels like one of those topics you know you should understand but keep pushing off until it becomes urgent. That makes sense. Nobody wakes up excited about replacing a roof. But when your shingles are curling, your attic has water stains after every heavy rain, or your contractor just told you that patching the same section a third time no longer makes financial sense, the process moves from abstract to immediate. Understanding current roof replacement costs in Northern Virginia is an important first step. Knowing what happens at each stage — from the first inspection through the final walkthrough — puts you in a much stronger position to manage the project, control costs, and avoid the mistakes that catch unprepared homeowners off guard.
Woodbridge sits in the heart of Prince William County, and our homes face a specific set of weather challenges that directly affect how long a roof lasts and how replacement projects are planned. The humidity that settles over the Potomac River corridor accelerates algae growth on north-facing slopes. Summer thunderstorms roll through with wind gusts that test every shingle seal. Winter brings freeze-thaw cycles that expand water in hairline cracks and work flashing joints apart over months. And the occasional remnants of a tropical system can dump several inches of rain in a matter of hours, exposing every weakness in a roofing system simultaneously. These aren't hypothetical risks — they're the conditions your roof absorbs year after year.
This guide walks through the entire roof replacement process Woodbridge VA homeowners face, from recognizing the signs that replacement is the right call through choosing materials, preparing your property, understanding costs, and knowing what to expect on the day the crew shows up. Whether you're planning ahead for a roof that's approaching the end of its lifespan or responding to damage that's already happened, you'll finish this article with a clear picture of every step involved.
Understanding When You Need a Roof Replacement
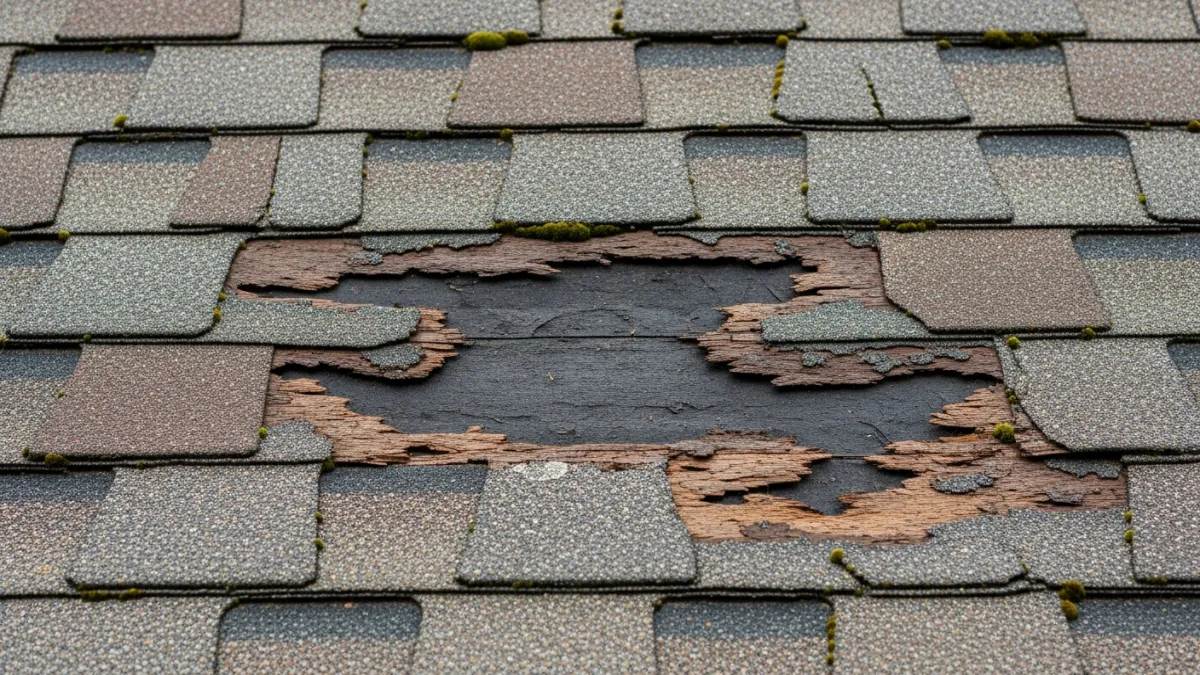
The first question every Woodbridge homeowner faces is whether their roof actually needs full replacement or whether targeted repairs can extend its useful life. Our guide on signs you need a new roof can help you make that determination. The answer depends on a combination of age, condition, and the pattern of problems you've been experiencing. Getting this decision right is one of the most consequential financial choices you'll make as a homeowner, because an unnecessary replacement wastes money while a delayed replacement allows damage to compound beneath the surface.
Age provides the foundation for the analysis. Standard architectural asphalt shingles — the type installed on most Woodbridge homes built or re-roofed in the past 25 years — carry manufacturer warranties of 25 to 30 years but typically deliver 20 to 25 years of reliable performance in the Northern Virginia climate. If your roof is under 15 years old and the problem is isolated to one area — a blown-off section from a storm, a single flashing failure, or a leaking pipe boot — repair is almost always the right call. The surrounding material still has years of service left, and a quality repair restores full function without the cost and disruption of tearing everything off.
Between 15 and 20 years, you need to look beyond the immediate problem and evaluate the roof as a whole system. Are shingle granules accumulating in your gutters after every rain? Do you see curling or cracking on multiple slopes, not just the one facing south? Have you invested in two or more repairs over the past few years? If the answer to these questions is yes, your roof is signaling that its remaining service life is limited. Each additional repair delivers diminishing returns on a system that's wearing out across its entire surface.
Past the 20-year mark, replacement is usually the financially sound decision unless the roof has been exceptionally well maintained and shows no signs of widespread deterioration. Virginia's climate is harder on roofing materials than many homeowners realize. Two decades of thermal cycling — attic temperatures reaching 140 degrees in July and dropping below freezing in January — progressively breaks down the asphalt binder that holds shingle granules in place. UV radiation degrades the surface continuously, even on overcast days. And the humidity common in the Woodbridge area promotes biological growth that holds moisture against the shingle surface and accelerates decay.
Storm damage introduces a separate calculation that can override age-based reasoning. A five-year-old roof with widespread hail damage is a legitimate candidate for full replacement through an insurance claim, regardless of how much life remains in the unaffected areas. Conversely, a 22-year-old roof with localized wind damage to a single slope might reasonably be repaired if the rest of the system is still performing. The key factor is whether the damage is isolated or distributed across the entire surface. Having an experienced Woodbridge roofing contractor present during the insurance adjuster's inspection ensures that all damage — including less obvious issues like bruised shingles and compromised underlayment — gets documented in the claim.
The Roof Replacement Process Step by Step
Understanding each phase of the roof replacement timeline removes uncertainty and helps you plan around the disruption. Here's what happens from the moment you pick up the phone through the day the last nail is driven.
Step 1: Initial Inspection and Assessment
A proper roof replacement starts with an on-site inspection, not a phone quote or a satellite-image estimate. Your contractor should spend 30 to 60 minutes on your property, examining the roof from the ground, from a ladder at multiple points, and from inside the attic. They're evaluating shingle condition on every slope, checking flashing at chimneys, walls, and penetrations, assessing the ridge vent and soffit ventilation, and looking for signs of decking deterioration from the underside. This inspection produces the data needed for an accurate scope of work and cost estimate.
During the inspection, ask your contractor to explain what they're seeing and what it means. A quality professional welcomes questions and provides clear, direct answers without resorting to scare tactics or jargon. If the contractor suggests that your roof needs immediate replacement before you've even received a written estimate, that's a red flag — take time to get additional opinions.
Step 2: Written Estimate and Material Selection
After the inspection, you should receive a detailed written estimate that itemizes every component of the project. This includes the shingle product line and color, underlayment type (synthetic or self-adhering membrane), drip edge, flashing, pipe boots, ridge vent, starter strip, hip and ridge cap shingles, tear-off and disposal, and any decking replacement allowance. Labor and materials should be listed separately so you can evaluate each independently and compare proposals from different contractors on equal terms.
This is also when you select your roofing materials. Your contractor should present options that fit your budget and your home's architectural style, walk you through the trade-offs between material grades, and help you choose a color that complements your siding, trim, and neighborhood aesthetic. Don't rush this decision — you'll be looking at this roof for the next 25 to 50 years depending on the material you choose.
Step 3: Contract, Permits, and Scheduling
Once you've accepted an estimate, you'll sign a contract that outlines the scope, price, timeline, payment schedule, and warranty terms. Your contractor then pulls the required building permit from Prince William County. This permit ensures the finished work will be inspected by the county and must meet current Virginia Residential Code requirements for underlayment, fastener patterns, flashing, ventilation, and ice-and-water shield at eaves and valleys.
Scheduling depends on the season. During peak roofing season — roughly April through October in Northern Virginia — expect a two to four week lead time between signing the contract and the start of work. The winter months often allow shorter lead times, though temperature restrictions on shingle installation (most manufacturers require ambient temperatures above 40 degrees for proper adhesive activation) limit the available working days. Emergency situations involving active leaks are handled on an expedited basis, with temporary waterproofing within 24 to 48 hours.
Step 4: Tear-Off Day
On the morning of the project, the crew arrives between 7:00 and 8:00 AM. They'll position a dump trailer in your driveway, lay tarps to protect landscaping and hardscape around the perimeter of your home, and set up safety equipment including scaffolding or ladder stabilizers as needed. Then the tear-off begins.
Tear-off means removing every existing shingle, underlayment layer, and any deteriorated flashing down to the bare roof deck. This is the loudest and most disruptive phase of the project. Old materials are shoveled off the roof and fall into the dump trailer continuously. If your roof has two layers of shingles — not uncommon on older Woodbridge homes — the tear-off takes longer and generates significantly more debris.
Once the deck is exposed, the crew inspects every panel for soft spots, delamination, rot, or mold. Damaged decking panels are cut out and replaced with new plywood or OSB that matches the original thickness. This is a critical step — new shingles installed over compromised decking will fail prematurely because they lack a solid substrate for proper fastener engagement.
Step 5: Installation
With the deck verified and repaired, installation begins. The sequence follows a specific order that's designed to create overlapping layers of water protection from the bottom of the roof to the top:
- Drip edge is installed along the eaves and rakes to direct water away from the fascia boards
- Ice-and-water shield is applied at the eaves (extending at least 24 inches past the exterior wall line), in all valleys, and around penetrations — this self-adhering membrane provides a secondary waterproof barrier at the most vulnerable areas
- Synthetic underlayment covers the remaining deck surface, providing moisture protection beneath the shingles
- Starter strip shingles go along the eaves and rakes to create the initial adhesive seal
- Field shingles are installed from the eaves upward in overlapping courses, following the manufacturer's specified exposure and fastener pattern
- Flashing is installed at all wall transitions, chimneys, skylights, and other penetrations using step flashing, counter-flashing, or custom-fabricated pieces as needed
- Pipe boots are installed around all plumbing vent penetrations
- Hip and ridge cap shingles cover the peaks and hips of the roof, completing the waterproof envelope
- Ridge vent is installed along the roof peak to provide continuous exhaust ventilation for the attic
Each of these components plays a specific role, and skipping or shortcutting any of them creates a future failure point. A thorough contractor installs all of them regardless of whether they were present on the original roof.
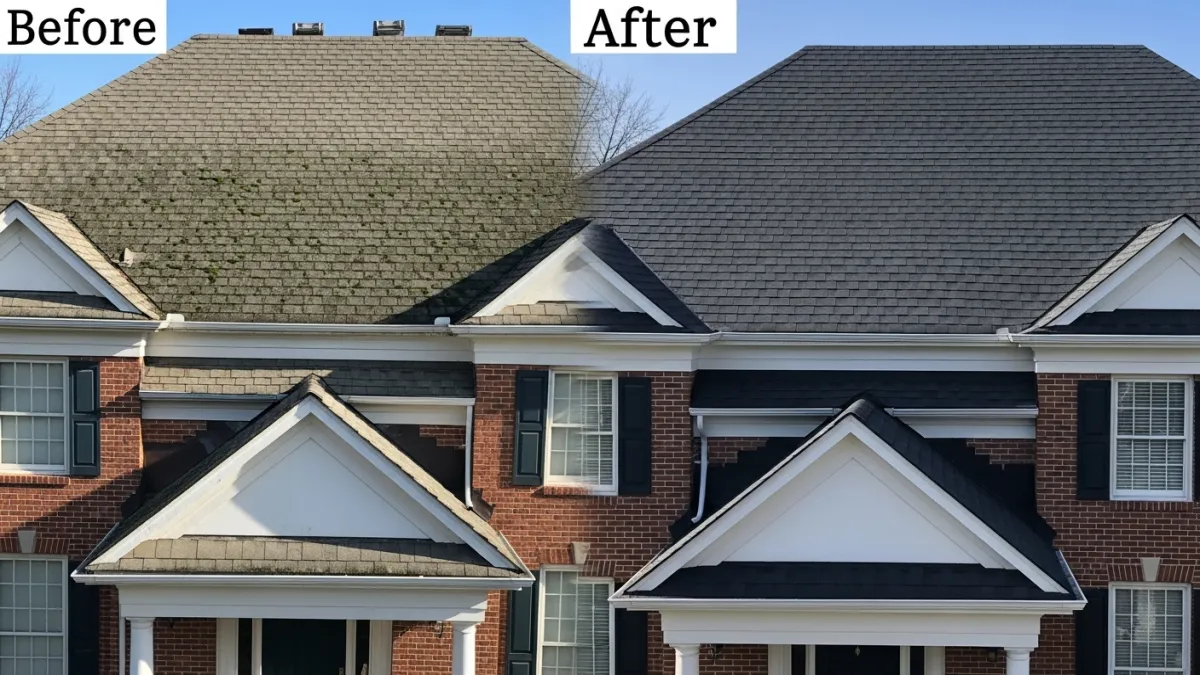
Step 6: Cleanup and Final Inspection
Cleanup happens throughout the project and gets especially thorough on the final day. The crew sweeps and runs magnetic nail finders across the entire yard, driveway, and walkways to collect stray fasteners. Gutters are cleaned of debris. All old materials, packaging, and trash are loaded into the dump trailer and hauled away. Your property should look better after the project than it did before, not worse.
Step 7: Final Walkthrough and Warranty Documentation
The project manager walks the completed roof with you, explaining what was installed, pointing out any areas where decking replacement was needed, and answering your questions about maintenance. You'll receive warranty documentation covering both the manufacturer's material warranty and the contractor's workmanship warranty. This is also the point where the county inspection is scheduled — the inspector verifies that the installation meets code, and a passing inspection closes out the permit.
How to Prepare Your Home and Property
Knowing how to prepare for roof replacement before the crew arrives makes the process smoother for everyone and protects your belongings from damage. Here's a practical checklist:
- Move vehicles out of the driveway and away from the house. The dump trailer needs driveway space, and falling debris can damage cars parked too close to the structure
- Clear a 15-foot perimeter around your home. Move patio furniture, grills, potted plants, and anything else that could be hit by debris or obstruct the crew's access
- Protect attic items. Vibration from tear-off can shake dust and small debris loose from the underside of the deck. Cover stored items in the attic with drop cloths or plastic sheeting
- Remove wall hangings on upper floors. The hammering during tear-off can vibrate frames off their hooks
- Trim back overhanging branches if any limbs are within five feet of the roof edge. Your contractor may handle this, but confirming in advance avoids delays
- Notify your HOA if your Woodbridge community has an architectural review process. Many HOAs in neighborhoods like Lake Ridge, Dale City, and Woodbridge proper require advance notification of exterior work and may need to approve the shingle color
- Tell your neighbors. The tear-off day is loud, and a heads-up is courteous. It also prevents concerned calls to the police or HOA from neighbors who don't know what's happening
- Arrange for pets and children. Keep them indoors and away from the work area throughout the project. Stray nails and falling debris create genuine safety hazards
- Mark sprinkler heads near the foundation with flags so the crew avoids damaging them when setting up tarps and ladders
Materials and Options for Woodbridge Homes
The material you select for your new roof determines its lifespan, energy performance, appearance, and cost. Here's an honest comparison of the options that make sense for Woodbridge homes.
Architectural Asphalt Shingles
This is by far the most popular choice in Woodbridge and across Northern Virginia. Architectural shingles (also called dimensional or laminate shingles) offer a layered, textured appearance that mimics the look of more expensive materials at a fraction of the cost. Major manufacturers like GAF, CertainTeed, and Owens Corning produce lines with 25 to 30 year warranties, and a well-installed architectural shingle roof in the Woodbridge climate can realistically deliver 20 to 28 years of performance. They're available in a wide range of colors and profiles, making them adaptable to virtually any home style from colonial to contemporary.
The main limitation of asphalt shingles is their vulnerability to extreme heat. Attic temperatures in poorly ventilated Woodbridge homes can reach 140 to 160 degrees in summer, which accelerates the aging of shingles from the underside. Proper ridge-and-soffit ventilation is essential to maximizing their lifespan.
Standing Seam Metal Roofing
Metal roofing has gained significant traction in Northern Virginia over the past decade. Standing seam panels interlock at raised seams, creating a continuous surface with no exposed fasteners. The result is a roof that can last 40 to 60 years, withstand wind speeds up to 140 mph, and reflect solar heat to reduce cooling costs. Metal is also lightweight, which reduces structural load, and it sheds snow and ice more effectively than asphalt — a genuine advantage during Woodbridge winters.
The trade-off is cost. Standing seam metal typically runs 1.5 to 2 times the price of architectural asphalt, which puts it outside the budget for some homeowners. It also requires specialized installation skills, so choosing a contractor with specific metal roofing experience is important.
Flat Roof Options: TPO, EPDM, and Modified Bitumen
Many Woodbridge homes — especially townhouses and homes with additions — have flat or low-slope roof sections that can't use standard shingles. These sections require membrane roofing systems. TPO (thermoplastic polyolefin) is the most popular choice for residential flat roofs due to its heat-welded seams, energy-reflective white surface, and 20 to 30 year lifespan. EPDM (ethylene propylene diene monomer) is a durable rubber membrane that has been used successfully on flat roofs for decades. Modified bitumen is a time-tested option that's especially well-suited for roofs with frequent foot traffic. Your contractor should recommend the system that best matches your roof's slope, drainage characteristics, and maintenance expectations.
| Material | Expected Lifespan | Wind Rating | Best For |
|---|---|---|---|
| Architectural Asphalt | 20–28 years | Up to 130 mph | Most residential homes, best value |
| Standing Seam Metal | 40–60 years | Up to 140 mph | Long-term homes, energy efficiency |
| TPO Membrane | 20–30 years | Varies by attachment | Flat/low-slope sections |
| EPDM Rubber | 25–30 years | Varies by attachment | Flat roofs, budget-friendly |
| Modified Bitumen | 15–20 years | Moderate | Flat roofs with foot traffic |
Cost of Roof Replacement in Woodbridge VA
Understanding roof replacement cost in Woodbridge starts with knowing that Northern Virginia prices run 15 to 25 percent above national averages. This premium reflects higher labor rates, stricter permitting requirements, material logistics costs, and the generally higher cost of doing business in the DMV metro area. The figures below are based on a standard 2,000 square foot home with a 6:12 or similar pitch and represent total installed costs including labor, materials, tear-off, and disposal.
| Service / Item | Low End | High End | Notes |
|---|---|---|---|
| Architectural asphalt shingles (2,000 sq ft) | $8,500 | $15,000 | Material + labor, NoVA market |
| Premium designer shingles (2,000 sq ft) | $12,000 | $18,000 | Adds 5–10 years lifespan |
| Standing seam metal roof (2,000 sq ft) | $16,000 | $22,000 | 40–60 year lifespan |
| TPO flat roof section (per 100 sq ft) | $600 | $1,200 | Low-slope/flat sections only |
| Tear-off and disposal (single layer) | $1,000 | $2,500 | Often included in total price |
| Second layer tear-off (additional) | $500 | $1,500 | Common on older Woodbridge homes |
| Decking replacement (per sheet, 4x8) | $75 | $150 | Quantity varies, found during tear-off |
| Permit — Prince William County | $75 | $250 | Required for full replacement |
| Ridge vent replacement | $300 | $800 | Included by most contractors |
Factors That Move Your Price Up or Down
Several variables cause your actual cost to land at different points within these ranges:
- Roof pitch: Steeper roofs require more safety equipment, take longer to work on, and use more material per square foot of floor plan. A 12:12 pitch costs noticeably more than a 4:12
- Roof complexity: Dormers, valleys, skylights, chimneys, and intersecting roof planes all add labor time and material. A simple gable roof is the least expensive; a multi-hip roof with several dormers is the most
- Number of existing layers: Removing two layers of old shingles takes more time and generates more disposal cost than removing one
- Decking condition: Replacing damaged decking is billed per sheet and can add $500 to $2,000+ to the total if significant rot or water damage has occurred
- Access: Homes on steep lots, with limited driveway space, or with extensive landscaping close to the foundation require more setup time and care
- Material grade: Within asphalt shingles alone, there's a meaningful cost difference between a standard architectural line and a premium designer product with enhanced wind and impact ratings
- Season: Off-season projects (November through February) may be priced slightly lower due to reduced demand, though weather limitations apply
What Is NOT Included in Most Estimates
Confirm whether these items are included or billed separately:
- Structural repairs to rafters or trusses discovered during the tear-off
- Gutter replacement or re-hanging if the existing gutters are damaged or improperly attached
- Fascia or soffit board replacement beyond minor patching
- Skylight replacement or re-flashing if the existing skylight is nearing end of life
- Chimney cap or crown repair
- Interior drywall repair for water damage caused by the old roof
Prices shown are typical ranges for Northern Virginia as of 2025 and vary based on home size, material grade, site access, and current material costs. Contact us for a free on-site estimate.
The most reliable way to know what your specific project will cost is to schedule an inspection. We provide detailed, itemized estimates at no charge. Book a free consultation and we'll walk through the numbers with you.
What to Expect During Roof Replacement
Knowing what to expect during roof replacement day by day helps you plan and reduces anxiety about the process. Here's a realistic picture of each phase.
Day One: Tear-Off
The first day is the loudest and most disruptive. The crew is removing all existing roofing materials and inspecting the deck beneath. Expect continuous noise from 7:00 AM until late afternoon. Debris falls into the dump trailer throughout the day. If you work from home, this is the day to consider working from a coffee shop or library. Pets should be kept in an interior room away from the noise.
Day Two: Installation
The second day shifts to installation — underlayment, shingles, flashing, and ventilation components. This phase is still noisy (nail guns run continuously) but less intense than tear-off. The roof begins to take shape, and you'll start to see the finished product emerging. On many Woodbridge homes with straightforward roof geometries, installation can be completed on this same day.
Day Three (If Needed): Completion and Detail Work
Larger or more complex homes may require a third day for finishing details — ridge cap installation, final flashing work around complex penetrations, and thorough cleanup. This is typically a shorter workday focused on precision rather than volume.
Weather Delays
Roofing work stops during rain. Most contractors won't install shingles below 40 degrees because the adhesive strips require warmth to seal properly. If the weather forces a pause mid-project, a professional crew tarps all open sections of the roof before leaving for the day. Your home stays protected overnight. The crew resumes as soon as conditions allow, and your project manager communicates schedule changes promptly. Woodbridge's mid-Atlantic weather is changeable, so building a day of buffer into your expectations is realistic.
Choosing the Right Woodbridge Roofing Contractor
The contractor you choose matters as much as the materials they install. Here's how to evaluate your options without stress:
- Verify DPOR licensing. Virginia requires roofing contractors to hold a license from the Department of Professional and Occupational Regulation. You can check any contractor's license status at the DPOR website in minutes. This is non-negotiable — an unlicensed contractor exposes you to liability and indicates they haven't met basic competency and financial responsibility standards
- Confirm insurance. Ask for certificates of both general liability insurance and workers compensation coverage. Verify them directly with the insurance carrier, not just by looking at the document
- Get three estimates. This establishes a reasonable price range for your project and helps identify outliers. A bid dramatically below the others is almost certainly cutting corners. A bid significantly above should come with a clear explanation of what additional value justifies the premium
- Check local experience. A contractor who has completed dozens of projects in Woodbridge and Prince William County understands local code requirements, the permit process, HOA dynamics in area neighborhoods, and the specific climate challenges that affect roof performance here
- Review the estimate for detail. A quality contractor provides an itemized scope with materials, labor, tear-off, disposal, permit fees, and decking replacement allowance listed separately. Vague lump-sum proposals are a warning sign
- Ask about their warranty. Understand what the manufacturer's material warranty covers, what the contractor's workmanship warranty covers, how long each lasts, and what could void either one
Trust your instincts during the process. If a contractor pressures you with "today-only" pricing, dismisses your questions, or refuses to put commitments in writing, those are signs to walk away. The right Woodbridge roofing contractor earns your confidence through transparency and competence, not through sales pressure.
Insurance Claims and Storm Damage Replacement
If your roof was damaged by a storm, the replacement process includes an additional layer of coordination with your insurance company. Here's how that typically works in Woodbridge:
- Document the damage. Take photos from the ground of any visible damage, note the date and nature of the storm, and contact your insurance company to file a claim
- Schedule a contractor inspection. Have your roofing contractor inspect the damage and prepare a detailed scope of work. This scope becomes the basis for your claim
- Adjuster meeting. Your insurance company sends an adjuster to inspect the roof. Having your contractor present during this meeting is strongly recommended — they can point out damage the adjuster might miss, including bruised shingles, compromised flashing seals, and damaged underlayment that isn't visible from the ground
- Claim approval and supplement. If the adjuster's initial assessment doesn't cover the full scope of necessary work, your contractor can submit a supplement with additional documentation. This is common and not adversarial — it's part of the standard process
- Project completion. Once the claim is approved, the project proceeds on the standard timeline. You're responsible for your deductible (typically $1,000 to $2,500), and the insurance payment covers the remainder
For more details on navigating the claims process, visit our roofing insurance claims page. We've helped many Woodbridge homeowners get full coverage for legitimate storm damage and can walk you through every step.
Ready to Start Your Roof Replacement?
Get a free, no-pressure estimate from Woodbridge Roofers. We'll inspect your roof, walk you through your options, and give you an honest assessment. Call us at (571) 570-7930 or schedule online.
Schedule Free ConsultationFrequently Asked Questions
Conclusion
The roof replacement process in Woodbridge doesn't have to be overwhelming. When you understand each step — from recognizing the signs that replacement is the right decision, through the inspection, material selection, permitting, tear-off, installation, and final walkthrough — you can manage the project with confidence instead of anxiety. The key decisions are choosing the right material for your home and budget, selecting a licensed and experienced contractor who provides transparent pricing and clear communication, and preparing your property so the work goes smoothly.
Woodbridge homes face real demands from Virginia's climate — heat, humidity, freeze-thaw cycles, and severe storms. A properly installed roof using quality materials protects your family and your investment for decades. Don't wait until a small problem becomes an expensive emergency. If your roof is showing signs of age or damage, or if you simply want a professional assessment of how much life it has left, call Woodbridge Roofers at (571) 570-7930 or book a free phone consultation. We'll give you an honest evaluation and a clear path forward.